2.2 - Simple Aircraft Gantt
We recommend structuring your Angular project as described in 2.1 - Angular.
You can download the starting point of this demo here:
> Download our example Angular project
Alternatively, here is the complete source code of the Simple Aircraft Gantt example:
> Download the whole source code of this example
(Follow 1 - Installation Step 5 to install ScheduleJS into these projects)
You now have an Angular component to host your new schedule. Now, most of the coding will happen in our simple-aircraft-gantt.component.ts file.
FlexGanttFX(JavaFX) code snippets are given if you are migrating to ScheduleJS.
If you want to take a quick peek at this example, you can have a look at the code (4 files).
Step 1 | Defining our Model
The model will define the whole data structure of the project. In this tutorial, we will build a simple GanttChart representing the activities of two Aircraft.
Step 1.1 | The Row
The Row class is being used to define a hierarchical data structure with the help of three type arguments: the first one specifies the type of the parent row, the second one the type of the children's rows, and the third one the type of activities that will be shown on the right-hand side of the Gantt chart.
An extension ModelObject of a Row could look like this:
class ModelObject<
       P extends Row, // Type of parent row.
	   C extends Row, // Type of child rows.
A extends Activity> extends Row<P, C, A> { }class ModelObject<
P extends Row<?,?,?>, // Type of parent row.
C extends Row<?,?,?>, // Type of child rows.
A extends Activity> extends Row<P, C, A> { }In this Gantt chart, we want to display a schedule of a few simple aircraft flights. Instances of Flight will be shown as a horizontal bar in the graphics area, while Aircraft will be displayed vertically in the tree table area.
Let's code!
Here, we will create a new file to hold our Aircraft and Flight classes and store them in a new folder that we will name model. This folder will have models and classes useful for our Gantt. Note that this architecture is just a recommendation.
Let's create a new model folder under /src/app/simple-aircraft-gantt/ and declare our Aircraft and Flight classes in it in a new aircraft.model.ts file:
import {Row, ActivityBase} from "schedule";

export class Aircraft extends Row<undefined, undefined, Flight> { } // A simple Row with no parent and no children.
export class Flight extends ActivityBase { }                        // A simple Activity for the Row.
As described, the Aircraft will represent a Row, its Activity is a Flight, and it will have no parent and no children rows.
The ActivityBase is the base for building Activity classes. Its minimal required data are a start time and an end time that are numbers expressed in seconds since Unix time.
Step 1.2 | The GanttChart object
We can now pass Aircraft as a type argument when creating an instance of GanttChart. This informs the GanttChart that all rows will have the Aircraft type.
We will now extend DefaultScheduleGanttComponentBase with our Gantt Row type <Aircraft> to inherit the boilerplate code of the default Gantt class.
If you are new to generic typings, more informations about type variables can be found on this page.
Now let's create the Gantt variable in the following file: /src/app/simple-aircraft-gantt/simple-aircraft-gantt.component.ts.
After editing the file, you should end up with this:
import {Component, Injector} from "@angular/core";
import {DefaultScheduleGanttComponentBase, AppTransactionalService, GanttChart} from "schedule"; // Add imports here.

import {Aircraft} from "./model/aircraft.model"; // Import the Aircraft row model.

@Component({
  selector: "app-simple-aircraft-gantt",
  templateUrl: "./simple-aircraft-gantt.component.html",
  styleUrls: ["./simple-aircraft-gantt.component.scss"]
})
export class SimpleAircraftGanttComponent extends DefaultScheduleGanttComponentBase<Aircraft> {

  // Create the Gantt chart.
  gantt = new GanttChart<Aircraft>(
    undefined,               // Root object.
    this._injector           // Dependency injection.
  );

  // Dependency injection.
  constructor(_appTransactionalService: AppTransactionalService, _injector: Injector) {
    super(_appTransactionalService, _injector);
  }

  start(): void {
    // The start method.
  }

}Step 1.3 | Mutable Activity
The ActivityBase class is used for read only data. If we want to edit flights, our Flight activity will need to extend the class MutableActivityBase instead of ActivityBase. Additionally we can attach a user object to any Activity. Here, we are going to attach our FlightData by building a class representing the data.
The minimal requirements for the MutableActivityBase are the name of the activity and its duration, represented by a start time and an end time. You can then attach any additional data using the FlightData class by linking it using the activity.setUserObject(data: object) method.
import {TimeUtil, MutableActivityBase, Row} from "schedule";

export class Aircraft extends Row<undefined, undefined, Flight> { }

export class FlightData {

  departureTime: number = TimeUtil.now();
  arrivalTime: number = TimeUtil.now() + TimeUtil.ofHours(6); // Set the flight duration to 6 hours.

  // Add additional properties you need here.

  constructor(public flightName: string, takeoffInHoursFromNow: number) {
    this.departureTime = this.departureTime + TimeUtil.ofHours(takeoffInHoursFromNow); // Set the departure time in hours from now.
    this.arrivalTime = this.arrivalTime + TimeUtil.ofHours(takeoffInHoursFromNow);
  }

}

// The new Flight class including FlightData.

export class Flight extends MutableActivityBase<FlightData> { // Activity is now Editable.

  constructor(data: FlightData) {                                  // The data object will hold all the flight metadata.
    super(data.flightName, data.departureTime, data.arrivalTime);  // Pass the name, start time and end time to MutableActivityBase.
    this.setUserObject(data);                                      // Attach some data with setUserObject(object) in the constructor.
  }

}Step 2 | Model Layers
All that is left to do now is to add Activities (here, Flights) to the Aircrafts. For this we can simply call the method Row.addActivity(Layer, Activity).
Rows do not store activities themselves, instead they are delegating all activity-related functionality to a data field of type ActivityRepository. The default repository is of type IntervalTreeRepository. Applications can implement their own repositories and register them by calling Row.setRepository().
Model Layers are used to create groups of activities so that they can be shown or hidden together. In our example we want to group Flights based on their service type. (cargo, charter, training, etc...)
import {Component, Injector} from "@angular/core";
import {AppTransactionalService, DefaultScheduleGanttComponentBase, GanttChart, Layer} from "schedule"; // Add imports here.

import {Aircraft} from "./model/aircraft.model";

@Component({
  selector: "app-simple-aircraft-gantt",
  templateUrl: "./simple-aircraft-gantt.component.html",
  styleUrls: ["./simple-aircraft-gantt.component.scss"]
})
export class SimpleAircraftGanttComponent extends DefaultScheduleGanttComponentBase<Aircraft> {

  gantt = new GanttChart<Aircraft>(
    undefined,
    this._injector
  );

  constructor(_appTransactionalService: AppTransactionalService, _injector: Injector) {
    super(_appTransactionalService, _injector);
  }

  start(): void {

    // Create Layers based on service type.
    const cargoLayer = new Layer("Cargo");
    const trainingLayer = new Layer("Training");
    const charterLayer = new Layer("Charter");

    // Add the Layers to the Gantt.
    this.gantt.getLayers().push(cargoLayer, trainingLayer, charterLayer);

  }

}Step 3 | Activities
Now the Gantt chart knows on which Model Layers it needs to render the Activities and we can now link the Activities to the Model Layers. This is done by adding the Activities to the Rows (Here, adding Flights to Aircraft) and specifying the target Model Layer at the same time. We will then add each Aircraft to the GanttChart using this.gantt.addRows(...rows). Finally, for this example we will set the Timeline to display a day on 400px using this.gantt.getTimeline().showTemporalUnit(ChronoUnit.DAYS, 400).
import {Component, Injector} from "@angular/core";
import {AppTransactionalService, ChronoUnit, DefaultScheduleGanttComponentBase, GanttChart, Layer} from "schedule"; // Add imports here.

import {Aircraft, Flight, FlightData} from "./model/aircraft.model"; // Import activity model.

@Component({
  selector: "app-simple-aircraft-gantt",
  templateUrl: "./simple-aircraft-gantt.component.html",
  styleUrls: ["./simple-aircraft-gantt.component.scss"]
})
export class SimpleAircraftGanttComponent extends DefaultScheduleGanttComponentBase<Aircraft> {

  gantt = new GanttChart<Aircraft>(
    undefined,
    this._injector
  );

  constructor(_appTransactionalService: AppTransactionalService, _injector: Injector) {
    super(_appTransactionalService, _injector);
  }

  start(): void {

    const cargoLayer = new Layer("Cargo");
    const trainingLayer = new Layer("Training");
    const charterLayer = new Layer("Charter");

    this.gantt.getLayers().push(cargoLayer, trainingLayer, charterLayer);

    // Create flights.
    const flight1 = new Flight(new FlightData("Cargo flight", 0));   // New flight with attached flight data.
    const flight2 = new Flight(new FlightData("Training flight", 9));
    const flight3 = new Flight(new FlightData("Charter flight", 18));
    const flight4 = new Flight(new FlightData("Cargo flight", 0));
    const flight5 = new Flight(new FlightData("Training flight", 9));
    const flight6 = new Flight(new FlightData("Cargo flight", 18));

    // Create an Aircraft and add its Activities on a specific Model Layer.
    const a380 = new Aircraft("A 380");
    a380.addActivity(cargoLayer, flight1);  // Add our flight to our a380 Aircraft on our cargoLayer.
    a380.addActivity(trainingLayer, flight2);
    a380.addActivity(charterLayer, flight3);

    // Create another Aircraft.
    const b747 = new Aircraft("B 747");
    b747.addActivity(cargoLayer, flight4);
    b747.addActivity(trainingLayer, flight5);
    b747.addActivity(charterLayer, flight6);

	// Add the aircraft rows to the Gantt Chart.
    const rows = [a380, b747];
    this.gantt.addRows(...rows);

    // Set the Timeline initial scale.
    this.gantt.getTimeline().showTemporalUnit(ChronoUnit.DAYS, 400);

  }

}
Current Result Overview
In the following code sample we are combining all of the steps from above and creating our component: SimpleAircraftGanttComponent.
For now, our component includes 4 files:
1 - The Angular HTML Template file: It will display the Timeline composed of a <schedule-date-line> and a <schedule-event-line>.
Below, it will display the Gantt using <default-schedule-gantt-graphic>.
<div class="simple-aircraft-gantt-time-line-block">

  <div class="simple-aircraft-gantt-time-line-info-filler"></div>

  <div class="simple-aircraft-gantt-time-line">

    <schedule-date-line [gantt]="gantt"></schedule-date-line>

    <schedule-event-line [gantt]="gantt"></schedule-event-line>

  </div>

</div>

<default-schedule-gantt-graphic class="simple-aircraft-gantt-graphic"
                                [gantt]="gantt"
                                [ganttContainerElement]="nativeElement">
</default-schedule-gantt-graphic>
2 - The Template SCSS file:
:host {

  display: flex;
  flex-direction: column;
  position: fixed;
  top: 0;
  right: 0;
  bottom: 0;
  left: 0;

  .simple-aircraft-gantt-time-line-block {

    display: flex;
    flex-direction: row;

    .simple-aircraft-gantt-time-line-info-filler {
      width: var(--info-column-width); // The width of the left column
      background: #eeeeee;
    }

    .simple-aircraft-gantt-time-line {
      flex: 1;
      display: flex;
      flex-direction: column;
    }

  }

  .simple-aircraft-gantt-graphic {
    flex: 1;
  }

}
3 - The Model definition file:
import {TimeUtil, MutableActivityBase, Row} from "schedule";

export class Aircraft extends Row<undefined, undefined, Flight> { }

export class FlightData {

  departureTime: number = TimeUtil.now();
  arrivalTime: number = TimeUtil.now() + TimeUtil.ofHours(6); // Every flight duration set to 6 hours.

  constructor(public flightName: string, takeoffInHoursFromNow: number) {
    this.departureTime = this.departureTime + TimeUtil.ofHours(takeoffInHoursFromNow);
    this.arrivalTime = this.arrivalTime + TimeUtil.ofHours(takeoffInHoursFromNow);
  }

}

export class Flight extends MutableActivityBase<FlightData> {

  constructor(data: FlightData) {
    super(data.flightName, data.departureTime, data.arrivalTime);
    this.setUserObject(data);
  }

}
4 - The main Typescript file:
import {Component, Injector} from "@angular/core";
import {AppTransactionalService, ChronoUnit, DefaultScheduleGanttComponentBase, GanttChart, GanttLayout, Layer} from "schedule";

import {Aircraft, Flight, FlightData} from "./model/aircraft.model";

@Component({
  selector: "app-simple-aircraft-gantt",
  templateUrl: "./simple-aircraft-gantt.component.html",
  styleUrls: ["./simple-aircraft-gantt.component.scss"]
})
export class SimpleAircraftGanttComponent extends DefaultScheduleGanttComponentBase<Aircraft> {

  gantt = new GanttChart<Aircraft>(
    undefined,
    this._injector
  );

  constructor(_appTransactionalService: AppTransactionalService, _injector: Injector) {
    super(_appTransactionalService, _injector);
  }

  start(): void {

    const cargoLayer = new Layer("Cargo");
    const trainingLayer = new Layer("Training");
    const charterLayer = new Layer("Charter");
    this.gantt.getLayers().push(cargoLayer, trainingLayer, charterLayer);

    const flight1 = new Flight(new FlightData("Cargo flight", 0));
    const flight2 = new Flight(new FlightData("Training flight", 9));
    const flight3 = new Flight(new FlightData("Charter flight", 18));
    const flight4 = new Flight(new FlightData("Cargo flight", 0));
    const flight5 = new Flight(new FlightData("Training flight", 9));
    const flight6 = new Flight(new FlightData("Charter flight", 18));

    const a380 = new Aircraft("A 380");
    a380.addActivity(cargoLayer, flight1);
    a380.addActivity(trainingLayer, flight2);
    a380.addActivity(charterLayer, flight3);

    const b747 = new Aircraft("B 747");
    b747.addActivity(cargoLayer, flight4);
    b747.addActivity(trainingLayer, flight5);
    b747.addActivity(charterLayer, flight6);

    const rows = [a380, b747];
    this.gantt.addRows(...rows);

    this.gantt.getTimeline().showTemporalUnit(ChronoUnit.DAYS, 400);

  }
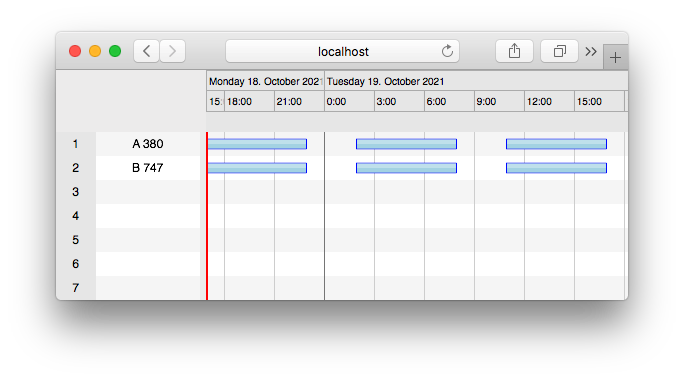
}The image below shows the three Flights of the two Aircraft we just created.
Step 4 | Activity Renderers
This result is not bad for just a few lines of code, however the rendering of the Flights is the default one. We can customise the rendering appearance by registering a different ActivityRenderer for the activity type Flight. This is done by calling the method graphics.setActivityRenderer(). The graphics element is the right-hand side of the Gantt chart. It will be responsible for rendering all Flights. We can now register our activity renderer like in the following example (see line 28).
import {Component, Injector} from "@angular/core";
import {ActivityBarRenderer, AppTransactionalService, ChronoUnit,
        DefaultScheduleGanttComponentBase, GanttChart, GanttLayout, Layer} from "schedule"; // Add imports here.

import {Aircraft, Flight, FlightData} from "./model/aircraft.model";

@Component({
  selector: "app-simple-aircraft-gantt",
  templateUrl: "./simple-aircraft-gantt.component.html",
  styleUrls: ["./simple-aircraft-gantt.component.scss"]
})
export class SimpleAircraftGanttComponent extends DefaultScheduleGanttComponentBase<Aircraft> {

  gantt = new GanttChart<Aircraft>(
    undefined,
    this._injector
  );

  constructor(_appTransactionalService: AppTransactionalService, _injector: Injector) {
    super(_appTransactionalService, _injector);
  }

  start(): void {

    const graphics = this.gantt.getGraphics();

    // New Activity Renderer.
    const newRenderer = new ActivityBarRenderer(graphics, "New Renderer");
    newRenderer.setBarHeight(5);

    // Register the new renderer.
    graphics.setActivityRenderer(
      Flight,
      GanttLayout,
      newRenderer
    );

    const cargoLayer = new Layer("Cargo");
    const trainingLayer = new Layer("Training");
    const charterLayer = new Layer("Charter");
    this.gantt.getLayers().push(cargoLayer, trainingLayer, charterLayer);

    const flight1 = new Flight(new FlightData("Cargo flight", 0));
    const flight2 = new Flight(new FlightData("Training flight", 9));
    const flight3 = new Flight(new FlightData("Charter flight", 18));
    const flight4 = new Flight(new FlightData("Cargo flight", 0));
    const flight5 = new Flight(new FlightData("Training flight", 9));
    const flight6 = new Flight(new FlightData("Charter flight", 18));

    const a380 = new Aircraft("A 380");
    a380.addActivity(cargoLayer, flight1);
    a380.addActivity(trainingLayer, flight2);
    a380.addActivity(charterLayer, flight3);

    const b747 = new Aircraft("B 747");
    b747.addActivity(cargoLayer, flight4);
    b747.addActivity(trainingLayer, flight5);
    b747.addActivity(charterLayer, flight6);

    const rows = [a380, b747];
    this.gantt.addRows(...rows);

    this.gantt.getTimeline().showTemporalUnit(ChronoUnit.DAYS, 400);

  }

}This replaces the default activity renderer with a renderer that draws a fixed-height bar. What's interesting about this code is that we are not only passing the activity type and the renderer instance but also a layout type. We don't want to spend too much time on layouts in the context of this quick start guide but let's just say that ScheduleJS is capable of displaying activities in several different ways (as time bars, as chart entries). If you want to build a more complex ActivityRenderer that will differentiate each Model Layer, you can implement the renderer given in 3.3.5 - Activity Rendering.
Our example now looks like this:

We can now add a DefaultScheduleButtonBar to the example. This allows us to perform actions on the chart and also to verify that the layers have been added properly. The following lines of code are needed for this.
<!-- Button bar -->
<default-schedule-button-bar [gantt]="gantt"></default-schedule-button-bar>
<!-- Timeline -->
<div class="simple-aircraft-gantt-time-line-block">
<div class="simple-aircraft-gantt-time-line-info-filler"></div>
<div class="simple-aircraft-gantt-time-line">
<schedule-date-line [gantt]="gantt"></schedule-date-line>
<schedule-event-line [gantt]="gantt"></schedule-event-line>
</div>
</div>
<!-- Gantt -->
<default-schedule-gantt-graphic class="simple-aircraft-gantt-graphic"
[gantt]="gantt"
[ganttContainerElement]="nativeElement">
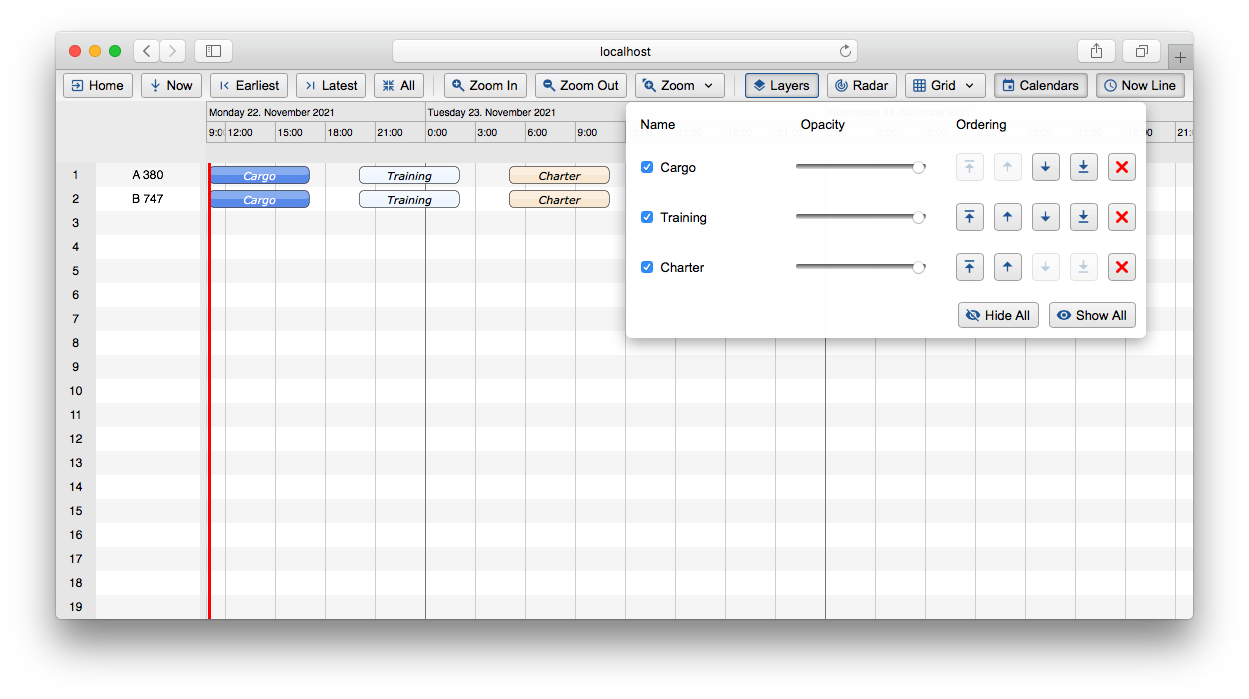
</default-schedule-gantt-graphic>You should see the different Model Layers when clicking on the Layers button, and you could redefine their orders and opacity. Note that their order effects which layer is going to be drawn above or below. The following screen shows the Layer View and how looks the Model Layer specific ActivityRenderer.
Step 5 | Events
Now that we have visualised our data we obviously want to interact with it and we want to be informed about the changes that we make. Our activities are, by default, editable. This means we can drag them horizontally. To receive events we need to subscribe to an Angular observable to receive an ActivityEvent object describing the event. To get more information about the event, you could do the following in your simple-aircraft-gantt.component.ts file (see line 26):
import {Component, Injector} from "@angular/core";
import {ActivityBarRenderer, AppTransactionalService, ChronoUnit,
        DefaultScheduleGanttComponentBase, GanttChart, GanttLayout, Layer} from "schedule";

import {Aircraft, Flight, FlightData} from "./model/aircraft.model";

@Component({
  selector: "app-simple-aircraft-gantt",
  templateUrl: "./simple-aircraft-gantt.component.html",
  styleUrls: ["./simple-aircraft-gantt.component.scss"]
})
export class SimpleAircraftGanttComponent extends DefaultScheduleGanttComponentBase<Aircraft> {

  gantt = new GanttChart<Aircraft>(
    undefined,
    this._injector
  );

  constructor(_appTransactionalService: AppTransactionalService, _injector: Injector) {
    super(_appTransactionalService, _injector);
  }

  start(): void {

    const graphics = this.gantt.getGraphics();
    this.subscribe(graphics.getActivityEventsObs(), event => console.log(event)); // Subscribe to the event.

    const newRenderer = new ActivityBarRenderer(graphics, "New Renderer");
    newRenderer.setBarHeight(5);

    graphics.setActivityRenderer(
      Flight,
      GanttLayout,
      newRenderer
    );

    const cargoLayer = new Layer("Cargo");
    const trainingLayer = new Layer("Training");
    const charterLayer = new Layer("Charter");
    this.gantt.getLayers().push(cargoLayer, trainingLayer, charterLayer);

    const flight1 = new Flight(new FlightData("Cargo flight", 0));
    const flight2 = new Flight(new FlightData("Training flight", 9));
    const flight3 = new Flight(new FlightData("Charter flight", 18));
    const flight4 = new Flight(new FlightData("Cargo flight", 0));
    const flight5 = new Flight(new FlightData("Training flight", 9));
    const flight6 = new Flight(new FlightData("Charter flight", 18));

    const a380 = new Aircraft("A 380");
    a380.addActivity(cargoLayer, flight1);
    a380.addActivity(trainingLayer, flight2);
    a380.addActivity(charterLayer, flight3);

    const b747 = new Aircraft("B 747");
    b747.addActivity(cargoLayer, flight4);
    b747.addActivity(trainingLayer, flight5);
    b747.addActivity(charterLayer, flight6);

    const rows = [a380, b747];
    this.gantt.addRows(...rows);

    this.gantt.getTimeline().showTemporalUnit(ChronoUnit.DAYS, 400);

  }

}
When we run our application, moving an Activity will now log the following output in the browser console.

You will notice the three different event types ..._STARTED, ..._ONGOING, and ..._FINISHED. The first one gets fired when the user initiates an action, the second while the action is still in progress, and the third one when the action has finished. You can subscribe to other observables about the Timeline, the Eventline... etc.
Make sure to take a look at the various event types defined in the ActivityEvent class to find out how much information you can receive when the user performs editing operations.
All right! Your first scheduling application is up and running. To go more into details and see what's possible to build with ScheduleJS, please check out 3 - Elements, 4 - Model and 5 - Styling (CSS).